How To Label An Electrical Panel
A clearly labeled electrical panel is essential for a variety of reasons. However, if your electrical panel doesn’t feature clear labels, it’s time to change that. Luckily the process of labeling your panel is relatively straightforward and only takes a few hours. This Bay Power guide reviews how to label electrical panels and why you should, so continue reading to learn more!
Why Do You Need To Label An Electrical Panel?
Although you might question the reasoning behind labeling an electrical panel, it’s an essential piece of the puzzle. That’s because while you can quickly determine which breaker trips even without labels, it’s much harder to isolate which breaker you want to cut power to when working on your electrical devices.
Here are a few critical reasons to label your electrical panel:
Safety
Clearly labeled electrical panels are critical for safety. That’s because emergencies may arise, requiring you to quickly cut power to an appliance or outlet. But, if your breaker panel is poorly labeled then you’ll waste precious time trying to find the right one. In emergencies, each second is critical, so it’s important to label each breaker clearly.
Electrical Code Requirements
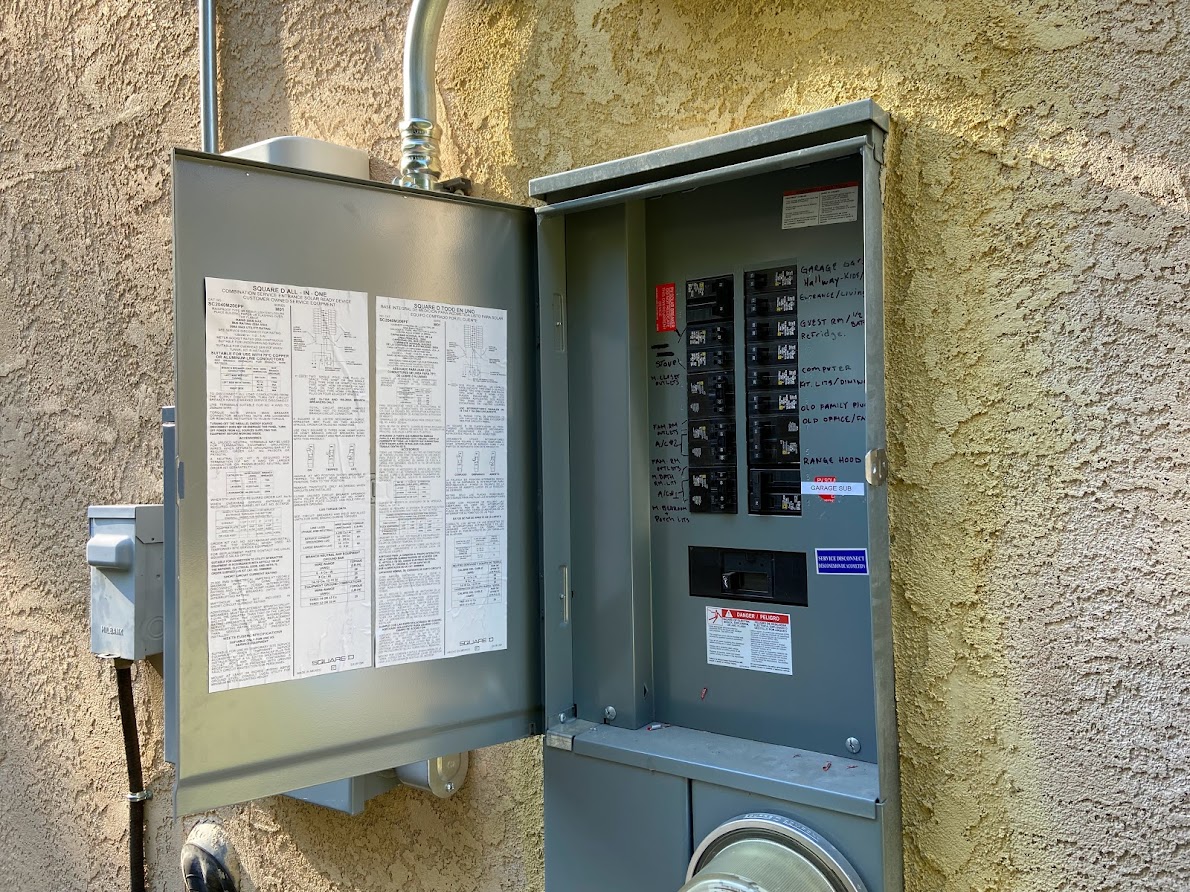
Electrical codes require homes and businesses to have clearly labeled circuit breakers in the electrical panel. So, while you might be tempted to skip labeling altogether that may not be a good idea. Be sure to label each breaker neatly, with actual words, not symbols.
Renovations
While renovations might not be a consideration at this point, many business owners choose to switch things up at some point. Whether that means switching out light receptacles or trading out an old appliance, it’s helpful to know which breakers control which fixtures and appliances.
By having neatly labeled circuit breakers, you or your contractor won’t have to sift through breakers one by one to isolate the desired circuit. This will save time and money in the long run.
How To Correctly Label An Electrical Panel
Labeling an electrical panel isn’t overly complicated, but it’ll take a while. The exact time you’ll spend identifying each breaker varies based on the size of the building, but it can take anywhere from one to four hours.
Here’s how to correctly label an electrical panel:
1. Gather Your Materials
First, you’ll need to collect your materials. Here’s what you’ll need:
- Pen and paper
- Sticky labels
- Night lights, radios, lamps, or electrical testers
- Walkie-talkies (or phones) for each person
2. Grab A Partner
Once you gather all your materials, you’ll need to enlist the help of a friend, neighbor, or family member. This is a two-person job, so you’ll need an extra set of hands. One person will stay at the electrical panel and slowly flip breakers on and off while the other wanders around the house to determine what the breaker controls.
If you have a few extra helpers, you might find it easier to determine which part of the house is controlled by each circuit by simply testing lights or outlets as you cycle the breakers.
3. Find The Electrical Panel
Once you’re ready, you need to find the electrical panel. Panels are often tucked out of the way but in an easily accessible location. They can be located in the basement, garage, laundry or other rooms.
If you have an electrical meter tacked to the exterior of your house, you may find the panel on the opposite side of the wall. Or, if you have a sub-panel, there might be an auxiliary panel tucked away in a workshop or shed.
4. Turn Off The Circuits
Once you find the circuit, send one person to the room you want to start with. The other person should remain at the electrical panel to flip the breakers. For easy explanation, Person 1 will be the individual at the electrical panel, while Person 2 is the individual in the room.
Person 2 needs to find each receptacle and light in the room, then turn everything on and plug something into each outlet (lamp, radio, night light, etc.). Next, turn on everything in the room, including TVs, radios, and lamps.
Once everything is on, let Person 1 know. While they wait, Person 1 should ensure each breaker and fuse is numbered. Assign a number to each breaker or fuse that doesn’t have a number using a Sharpie marker on the metal part of the panel.
When both people are ready, turn on the walkie-talkies or cell phones to keep an open line of communication. Next, Person 1 will methodically begin working through the electrical panel, turning off each breaker one at a time.
If Person 2 notices no changes, flip the breaker back on and move to the next one. Be sure to flip the breakers firmly but not aggressively. If the electrical panel has fuses, ensure you screw each fuse back on squarely and completely.
As Person 1 moves through the breakers or fuses, Person 2 must watch for the lights, radios, lamps, and other fixtures to turn off. As soon as the power cuts to the room, let Person 1 know. Then, confirm the breaker by turning it on and off again to ensure it controls that room.
Once you confirm the room and breaker connection, write down the breaker number and what room it controls on paper. Again, keep your room identifiers basic, like “west bedroom” or “second-floor bathroom.”
5. Work Your Way Through
Continue working through the rooms in your building until you have each breaker paired to a region. Pay attention to switched receptacles, which only work when the switch is on. Also, check the exterior receptacles and lights, as these will pair with a breaker.
Carefully mark each breaker number on your sheet of paper and pair it with the correct region of your building. Once you have each breaker number marked with its correlating room, you can transfer the information to the electrical panel.
Generally, it’s easiest to write the region on a small sticky label and attach it to the metal next to each breaker. Alternatively, you can write the information with a label marker directly on the metal. While you could write the information on a tiny strip of paper and tape it to the metal, it’s usually easier to use one of the previous methods.
The Bottom Line
Despite the time-consuming nature of labeling an electrical panel, the results are well worth it. Simply grab a partner, collect your materials, and work through the electrical panel and eventually you’ll have a clearly labeled electrical panel.


